Red Velvet Marble Cupcakes: A Whimsical Twist on a Classic
Red velvet is a flavor that evokes a sense of celebration and luxury. But why settle for a solid red cupcake when you can create a beautiful, whimsical marble effect? These **Red Velvet Marble Cupcakes** combine the classic, tangy cocoa flavor of red velvet with a sweet vanilla batter, creating a stunning visual contrast in every bite.
In this guide, we will master the marbling technique, discuss the importance of buttermilk in red velvet, and share the secret to the perfect, pipeable cream cheese frosting.
The Science of the Red Velvet Tang
What makes red velvet “red velvet” isn’t just the color; it’s the unique combination of ingredients that creates a specific flavor and texture. The key players are buttermilk, vinegar, and a touch of cocoa powder.

The acidity of the buttermilk and vinegar reacts with the baking soda to create a light, airy crumb. This reaction also helps to brighten the red food coloring. The cocoa powder should be used sparingly—just enough to provide a hint of chocolate that complements the tang of the buttermilk without overpowering it.
Mastering the Marbling Technique
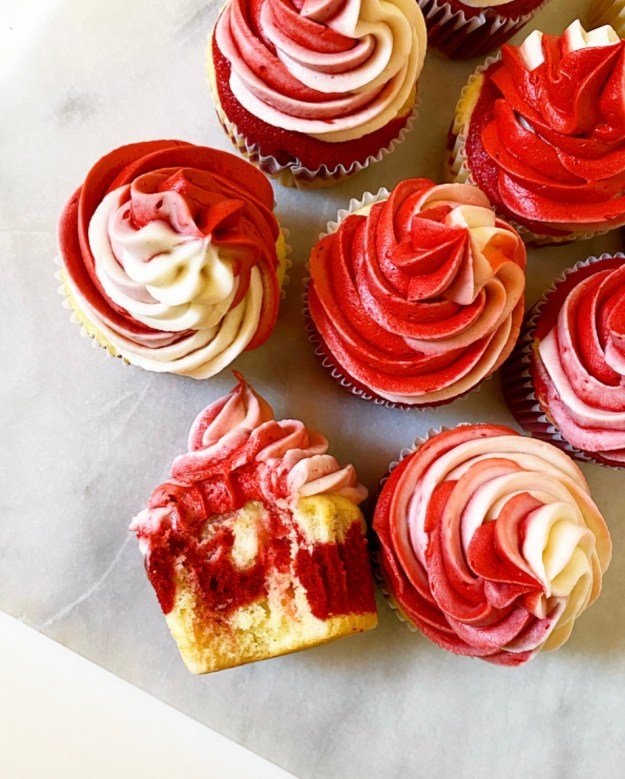
The beauty of these cupcakes lies in the swirl. To achieve a perfect marble effect, you need to start with two distinct batters of similar consistency. By dividing your base batter and adding the red coloring and cocoa to only one half, you ensure that the two flavors will bake at the same rate.
When filling your cupcake liners, use a small cookie scoop or a tablespoon. Alternate drops of the white and red batter until the liner is about two-thirds full. Then, take a toothpick or a small skewer and swirl it through the batter in a figure-eight motion. Be careful not to over-mix, or you’ll end up with a solid pink cupcake instead of a marbled one!
Why We Use Oil Instead of Butter
For these cupcakes, we prefer vegetable oil over butter. Oil is 100% fat and remains liquid at room temperature, which results in a cupcake that is incredibly moist and has a longer shelf life.

Butter-based cupcakes can sometimes become dense or dry, especially if they are refrigerated (which is necessary for cream cheese frosting). By using oil, we ensure that even after a day in the fridge, your Red Velvet Marble Cupcakes will remain soft and tender.
The Secret to Perfect Cream Cheese Frosting
No red velvet treat is complete without cream cheese frosting. However, many home bakers struggle with frosting that is too soft or runny. The secret is in the temperature and the ratio.
Ensure both your cream cheese and butter are softened but still slightly cool to the touch. If they are too warm, the frosting will lose its structure. We use a higher ratio of cream cheese to butter to ensure that signature tang is the star of the show. If your frosting feels too soft, simply refrigerate it for 15-20 minutes before piping.
Choosing the Right Food Coloring
For that vibrant, “stop-light” red, we recommend using gel food coloring rather than liquid. Gel coloring is much more concentrated, meaning you can achieve a deep color without adding excess liquid to your batter, which can affect the bake.
If you prefer a more natural approach, you can use beet powder, though the color will be more of a deep burgundy than a bright red.
Decorating for a Professional Look
While the marble effect inside is a surprise, you can hint at it with your decoration. Try using a large star tip to pipe a high swirl of frosting. You can even “stripe” your piping bag with a little red food coloring before adding the white frosting to create a marbled look on the outside as well.
A sprinkle of red velvet cake crumbs or some tiny red heart sprinkles makes these cupcakes perfect for Valentine’s Day, birthdays, or any special occasion.
Storing and Serving Your Cupcakes
Because of the cream cheese frosting, these cupcakes must be stored in the refrigerator. Keep them in an airtight container to prevent them from absorbing any fridge odors.
For the best eating experience, take the cupcakes out of the fridge about 20-30 minutes before serving. This allows the frosting to soften slightly and the flavors of the cake to become more pronounced. They will stay fresh for up to four days in the refrigerator.
Ingredients
Method
- Preheat oven to 350°F (175°C) and line a muffin tin.
- Whisk flour, sugar, baking soda, and salt in a large bowl.
- In another bowl, whisk oil, buttermilk, egg, vanilla, and vinegar.
- Combine wet and dry ingredients until smooth.
- Divide the batter into two bowls. In one bowl, stir in the cocoa powder and red food coloring.
- Drop a spoonful of white batter and a spoonful of red batter into each cupcake liner.
- Use a toothpick to gently swirl the two colors together.
- Bake for 18-20 minutes until a toothpick comes out clean.
- Cool completely on a wire rack.
- Beat cream cheese and butter until fluffy.
- Gradually add powdered sugar and vanilla, beating until smooth.
- Pipe onto cooled cupcakes.