Introduction
Imagine a tender, juicy chicken breast baked to golden perfection, infused with the creamy, tangy, and herbaceous notes of classic ranch seasoning. The aroma alone is enough to draw everyone to the table, with hints of garlic, dill, and buttermilk swirling through your kitchen. This Baked Ranch Chicken Recipe transforms simple ingredients into a comforting, flavorful dish that feels both homey and indulgent. The crisp edges and moist interior create a delightful contrast that keeps you savoring every bite.
This dish stars chicken breasts as the canvas, coated generously in a blend of ranch seasoning, garlic powder, and a touch of Parmesan cheese for a savory crust. The magic lies in the combination of ingredients that create a burst of flavor without overpowering the natural taste of the chicken. Using fresh herbs or a high-quality ranch mix elevates the entire experience, making it a perfect weeknight dinner or a meal to impress guests without the fuss.

Personally, this recipe holds a special place in my heart. It reminds me of cozy family dinners where the kitchen was filled with laughter and the comforting smell of something delicious baking in the oven. It’s a dish that’s simple enough to make any day feel special yet full of flavors that invite smiles around the dinner table. Whether you’re cooking for yourself or loved ones, this baked ranch chicken brings warmth and joy with every forkful.
Why This Recipe Works
This recipe works wonders because it marries the science of cooking with the art of flavor layering. Baking chicken breasts ensures even cooking, allowing the meat to retain its moisture while developing a golden crust. The ranch seasoning—typically a blend of garlic powder, onion powder, dill, parsley, and buttermilk powder—adds complex savory notes that penetrate the chicken during baking.
The addition of Parmesan cheese creates a beautifully crisp and slightly nutty crust that contrasts perfectly with the tender interior. This balance of textures and flavors ensures that every bite is satisfying. The secret lies in seasoning the chicken generously and baking it at the right temperature to lock in juices, making it juicy, flavorful, and irresistibly tender.
Using a simple yet effective coating method, the seasoning adheres well to the chicken, providing an intense flavor punch without the need for heavy sauces. The result is a light yet crave-worthy dish that feels indulgent and wholesome at the same time.
Key Ingredients for Success
- Chicken breasts: The star of the dish, boneless and skinless chicken breasts offer lean protein and a mild flavor that absorbs the ranch seasoning beautifully. For best results, choose fresh chicken breasts of even thickness to ensure uniform cooking.
- Ranch seasoning mix: Whether homemade or store-bought, this blend of herbs and spices is essential. Look for a mix with garlic, onion, dill, parsley, and buttermilk powder to replicate that classic ranch taste. Homemade mixes allow you to control sodium and freshness.
- Parmesan cheese: Freshly grated Parmesan adds a savory, salty crunch to the crust. Avoid pre-grated varieties with anti-caking agents for a meltier, more cohesive crust.
- Olive oil or melted butter: A small amount helps the seasoning stick and promotes browning. Butter adds richness, while olive oil contributes a subtle fruity note.
- Garlic powder and onion powder: Enhances the ranch mix with deeper, aromatic flavors, ensuring every bite bursts with savory goodness.
- Lemon zest (optional): Adds a bright, citrusy lift that balances the richness and enhances the fresh herb notes.
- Fresh herbs (optional): Parsley or dill sprinkled on top after baking adds color and a fresh finish.
If you can’t find ranch seasoning, you can easily create your own by mixing dried parsley, dill, garlic powder, onion powder, salt, pepper, and a pinch of dried chives. For a dairy-free version, substitute Parmesan with nutritional yeast for a cheesy flavor without the dairy.

Pro Tips for the Perfect Baked Ranch Chicken Recipe
- Even thickness: Pound the chicken breasts to an even thickness before seasoning. This ensures they cook evenly, preventing dry edges or undercooked centers.
- Generous seasoning: Don’t be shy with the ranch mix and Parmesan—coat each piece thoroughly for maximum flavor and a crispy crust.
- Preheat your oven: A hot oven set at 400°F (200°C) helps seal in juices and develop a golden crust quickly without drying out the chicken.
- Use a wire rack: Place the chicken on a wire rack set over a baking sheet. This allows heat to circulate evenly around the chicken, promoting crispiness on all sides.
- Rest before slicing: Let the chicken rest for 5 minutes after baking to redistribute the juices, ensuring every bite is juicy and tender.
Common mistakes include under-seasoning, overcrowding the pan, or baking at too low a temperature, all of which can lead to bland or dry chicken. Following these pro tips guarantees a flavorful, moist, and beautifully textured dish every time.
Step-by-Step: Bringing It to Life
Start by preheating your oven to 400°F (200°C), setting the stage for a hot, even cooking environment. While the oven is warming up, prepare your chicken breasts by patting them dry with paper towels. This step is crucial for helping the seasoning stick and achieving a crispy crust.
Next, pound the chicken breasts gently using a meat mallet or rolling pin until they are an even thickness, about ¾ inch thick. This ensures they cook uniformly, avoiding dry spots or undercooked centers.
In a small bowl, combine your ranch seasoning mix, freshly grated Parmesan, garlic powder, and onion powder. Add a pinch of salt and pepper to balance the flavors. If you like a hint of brightness, stir in some lemon zest.
Brush each chicken breast lightly with olive oil or melted butter. This not only helps the seasoning adhere but also promotes a golden, crispy finish during baking. Coat each piece generously with the seasoning mixture, pressing the mixture into the chicken to create a flavorful crust.
Place the seasoned chicken breasts on a wire rack set atop a baking sheet. The wire rack allows hot air to circulate around the chicken, helping the crust crisp evenly while the chicken cooks through.
Slide the baking sheet into the preheated oven and bake for 20-25 minutes. Keep an eye on the chicken as the edges begin to sizzle and turn a gorgeous golden brown. The aroma of garlic, herbs, and Parmesan will fill your kitchen, signaling that dinner is almost ready.
To ensure perfect doneness, check the internal temperature with a meat thermometer—it should reach 165°F (74°C). Once done, remove the chicken from the oven and let it rest for about 5 minutes. This resting period lets the juices redistribute, keeping the meat tender and moist.
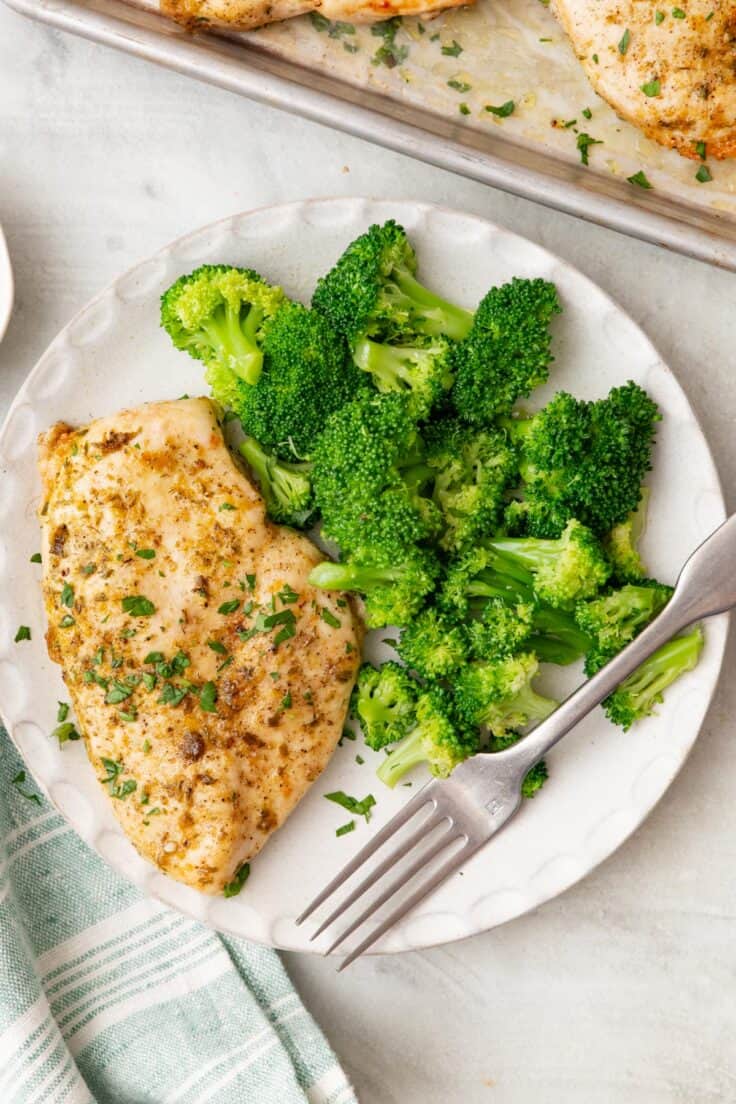
Finally, garnish with freshly chopped parsley or dill if desired, and serve hot alongside your favorite sides. The result is a juicy, flavorful chicken with a crispy, herbaceous crust that’s sure to delight every palate.
Variations and Creative Twists
To keep this dish exciting, try these fun variations and customizations:
- Spicy Ranch Kick: Add a pinch of cayenne pepper or smoked paprika to the seasoning mix for a subtle heat that warms the palate.
- Dairy-Free Delight: Swap Parmesan for nutritional yeast and use a dairy-free ranch seasoning blend to accommodate lactose intolerance or vegan diets.
- Herb-Infused Butter: Instead of olive oil, brush the chicken with herb-infused melted butter (think rosemary or thyme) for a richer, aromatic crust.
- Crunchy Topping: Mix panko breadcrumbs with the ranch seasoning and Parmesan for an extra crispy, crunchy coating that adds texture.
- Marinate For Depth: Marinate the chicken in buttermilk and ranch seasoning for a few hours before baking to deepen flavor and tenderness.
These variations allow you to tailor the recipe to your taste preferences, dietary needs, or mood while keeping the essence of baked ranch chicken alive and delicious.
Frequently Asked Questions
Q: Can I use chicken thighs instead of breasts?
A: Absolutely! Chicken thighs are a great option for juicier meat and richer flavor. Adjust the baking time to about 25-30 minutes and check for an internal temperature of 165°F (74°C).
Q: How do I store leftovers?
A: Store leftover baked ranch chicken in an airtight container in the refrigerator for up to 3-4 days. Reheat gently in the oven or microwave to preserve moisture and flavor.
Q: Can I freeze the cooked chicken?
A: Yes, you can freeze cooked baked ranch chicken. Wrap it tightly in foil or plastic wrap, then place it in a freezer-safe bag. Freeze for up to 3 months. Thaw overnight in the fridge before reheating.
Q: What if I don’t have ranch seasoning?
A: You can easily make your own by mixing dried parsley, dill, garlic powder, onion powder, salt, pepper, and a little dried chive. This DIY mix works just as well and lets you control the flavor intensity.
Q: How do I prevent dry chicken breasts?
A: Make sure to pound the chicken evenly, avoid overbaking, and let the chicken rest after cooking. Using a meat thermometer to check doneness (165°F) helps avoid drying out the meat.

Conclusion
If you’re craving a simple yet flavorful dinner, this Baked Ranch Chicken Recipe is your new best friend. It’s a perfect balance of juicy meat, crispy herb crust, and comforting flavors that can brighten up any meal. Give it a try and watch it become a family favorite in no time.
Feel free to share your own twists or ask questions in the comments below—I’d love to hear how your version turns out. Happy cooking and bon appétit!
Baked Ranch Chicken Recipe
Ingredients
Method
- Preheat your oven to 375°F (190°C) and lightly grease a baking dish.
- In a small bowl, mix ranch seasoning mix with mayonnaise until well combined.
- Pat the chicken breasts dry with paper towels and place them in the baking dish.
- Spread the ranch and mayonnaise mixture evenly over each chicken breast.
- Sprinkle shredded cheddar cheese over the coated chicken breasts.
- In another bowl, combine crushed crackers with melted butter and sprinkle this mixture on top of the chicken.
- Bake in the preheated oven for 25 to 30 minutes, or until the chicken is cooked through and topping is golden brown.
- Remove the chicken from the oven and let it rest for 5 minutes before serving to allow juices to redistribute.