Strawberry Swirl Cheesecake: A Symphony of Summer Flavors
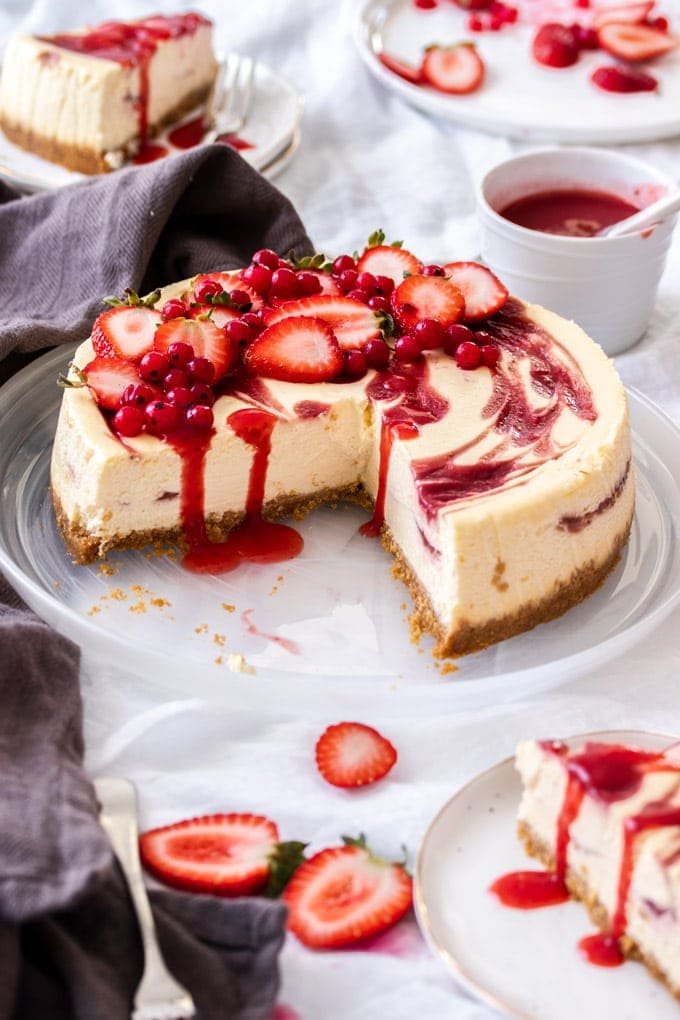
There is perhaps no dessert more visually stunning or universally loved than a **Strawberry Swirl Cheesecake**. It captures the essence of summer—bright, fresh fruit paired with the rich, velvety smoothness of a classic cheesecake. The beautiful red marbling on the surface makes it look like a work of art, yet it is surprisingly achievable for the home baker.
In this comprehensive guide, we will master the art of the perfect fruit swirl, discuss the importance of straining your puree, and ensure your cheesecake has that signature creamy texture.

The Importance of Fresh vs. Frozen Strawberries
While you can use frozen strawberries in a pinch, fresh, ripe berries are the gold standard for this recipe. Fresh strawberries have a more vibrant color and a more nuanced flavor that isn’t diluted by the excess water often found in frozen fruit.

If you must use frozen, ensure they are completely thawed and drained before pureeing. The goal is to have a concentrated fruit flavor that can stand up to the richness of the cream cheese without making the batter too watery.
Why You Must Strain Your Puree
One of the most common mistakes in making a **Strawberry Swirl Cheesecake** is skipping the straining step. Strawberry seeds are small, but they can disrupt the silky texture of the cheesecake. By pressing your puree through a fine-mesh sieve, you remove the seeds and any fibrous bits, resulting in a smooth, professional-grade sauce.
This strained puree not only tastes better but also swirls more elegantly, creating those clean, sharp lines that make the cake so visually appealing.
Achieving the Perfect Swirl Technique
The “swirl” is what gives this cake its name and its beauty. The key is to be gentle. If you over-swirl, the red puree will simply mix with the white batter, resulting in a pink cheesecake rather than a marbled one.

Use a thin knife, a skewer, or even a toothpick. Insert it just below the surface and move it in a figure-eight or circular motion. Remember: less is more. You want distinct ribbons of red and white to be visible on the surface.
The Role of Sour Cream in Cheesecake
You might notice that our recipe calls for a full cup of sour cream. This is a classic “secret ingredient” in New York-style cheesecakes. Sour cream adds a subtle tang that balances the sweetness of the sugar and the richness of the cream cheese.
More importantly, sour cream contributes to a softer, creamier texture. It prevents the cheesecake from becoming too dense or “heavy,” giving it a melt-in-your-mouth quality that is truly divine.
Baking in a Water Bath: Is it Necessary?
While we have provided instructions for slow-cooling in the oven, many professional bakers swear by the water bath (or *bain-marie*). A water bath involves placing your springform pan inside a larger pan filled with hot water.
The water acts as a buffer, ensuring the heat is distributed evenly and preventing the edges from overcooking before the center is done. If you are worried about cracks, a water bath is the most reliable insurance policy. Just be sure to wrap the bottom of your springform pan in multiple layers of heavy-duty foil to prevent water from leaking in.
Choosing the Right Graham Crackers
The crust is the foundation of your cheesecake, and not all graham crackers are created equal. For the best flavor, look for honey-flavored graham crackers. The subtle honey notes pair beautifully with the strawberries.
When making the crumbs, aim for a fine, sandy texture. If the pieces are too large, the crust will be crumbly and difficult to slice. A food processor is the best tool for this, but a rolling pin and a sealed plastic bag work just as well.
Garnishing for Maximum Impact
While the swirl is beautiful on its own, a few fresh strawberries on top can add a professional finishing touch. You can slice them and fan them out around the edge, or pile whole, glazed berries in the center.
A sprig of fresh mint adds a pop of green that makes the red of the strawberries stand out even more. Serve each slice with a little extra strawberry puree on the side for an extra burst of flavor.
Tips for Long-Term Storage
If you are making this for a party, you can easily prepare it two days in advance. In fact, the flavor of the strawberry puree intensifies after a day in the fridge.
For long-term storage, this cheesecake freezes beautifully. However, the strawberry swirl can sometimes bleed slightly into the white batter upon thawing. To minimize this, freeze the cake as quickly as possible and thaw it slowly in the refrigerator. It will remain delicious for up to two months in the freezer.
Ingredients
Method
- Preheat oven to 325°F (163°C).
- Mix crumbs, butter, and sugar; press into a 9-inch springform pan.
- Bake for 10 minutes, then cool.
- Puree strawberries in a blender.
- Strain through a fine-mesh sieve into a small saucepan.
- Whisk in sugar and cornstarch; simmer until thickened (about 5 minutes).
- Cool completely before using.
- Beat cream cheese and sugar until smooth.
- Mix in sour cream and vanilla.
- Add eggs one at a time, mixing on low speed just until combined.
- Pour half the filling over the crust.
- Drizzle half the strawberry puree over the filling.
- Repeat with remaining filling and puree.
- Use a knife or skewer to gently swirl the puree into the filling.
- Bake for 55-60 minutes until the edges are set but the center is still slightly jiggly.
- Cool in the oven for 1 hour, then refrigerate for at least 6 hours.