Red Velvet Cheesecake: A Luxurious Fusion of Two Classics
When you combine the vibrant, cocoa-infused allure of red velvet cake with the rich, creamy decadence of a classic New York-style cheesecake, the result is nothing short of spectacular. The **Red Velvet Cheesecake** is more than just a dessert; it is a statement piece, perfect for holidays, anniversaries, or any occasion that calls for a touch of elegance.
In this guide, we will explore the nuances of achieving that perfect crimson hue, the secret to a crack-free cheesecake, and how to balance the subtle chocolate notes with the tang of cream cheese.
The History and Allure of Red Velvet
Red velvet has a storied history, originally gaining popularity during the Victorian era. Its signature color was originally a chemical reaction between natural cocoa powder and acidic ingredients like buttermilk and vinegar. Today, while we use food coloring for that intense “velvet” look, the traditional ingredients remain essential for the flavor profile.

The “velvet” in the name refers to the fine, smooth crumb that the vinegar and buttermilk create. When translated into a cheesecake, this translates to an incredibly silky mouthfeel that sets it apart from standard vanilla versions.
Choosing the Right Cocoa Powder
For a true **Red Velvet Cheesecake**, the type of cocoa powder you use matters. We recommend using natural unsweetened cocoa powder rather than Dutch-processed. Natural cocoa is more acidic, which interacts better with the buttermilk and vinegar to provide that classic red velvet tang.

The cocoa should be subtle. Unlike a deep chocolate cheesecake, red velvet should have just a hint of chocolate that complements, rather than overpowers, the cream cheese base.
The Secret to a Perfect, Crack-Free Surface
Cheesecakes are notoriously finicky, often developing cracks during the cooling process. The secret to a smooth, professional surface lies in the temperature and the cooling method.
First, ensure all your ingredients—especially the cream cheese and eggs—are at room temperature before you begin. This prevents over-beating, which incorporates too much air into the batter. Second, use the “oven-door” cooling method. By letting the cheesecake cool slowly in the oven with the door ajar, you prevent the sudden temperature shock that causes the cake to contract and crack.
Why We Use Buttermilk and Vinegar
You might wonder why a cheesecake needs vinegar and buttermilk. These are the “secret weapons” of red velvet. The buttermilk adds a subtle tang and moisture, while the vinegar helps stabilize the red color and adds a brightness that cuts through the richness of the cream cheese.
This combination creates a complex flavor profile that is sweet, tangy, and slightly savory all at once. It is this complexity that makes red velvet so addictive.
Mastering the Oreo Crust
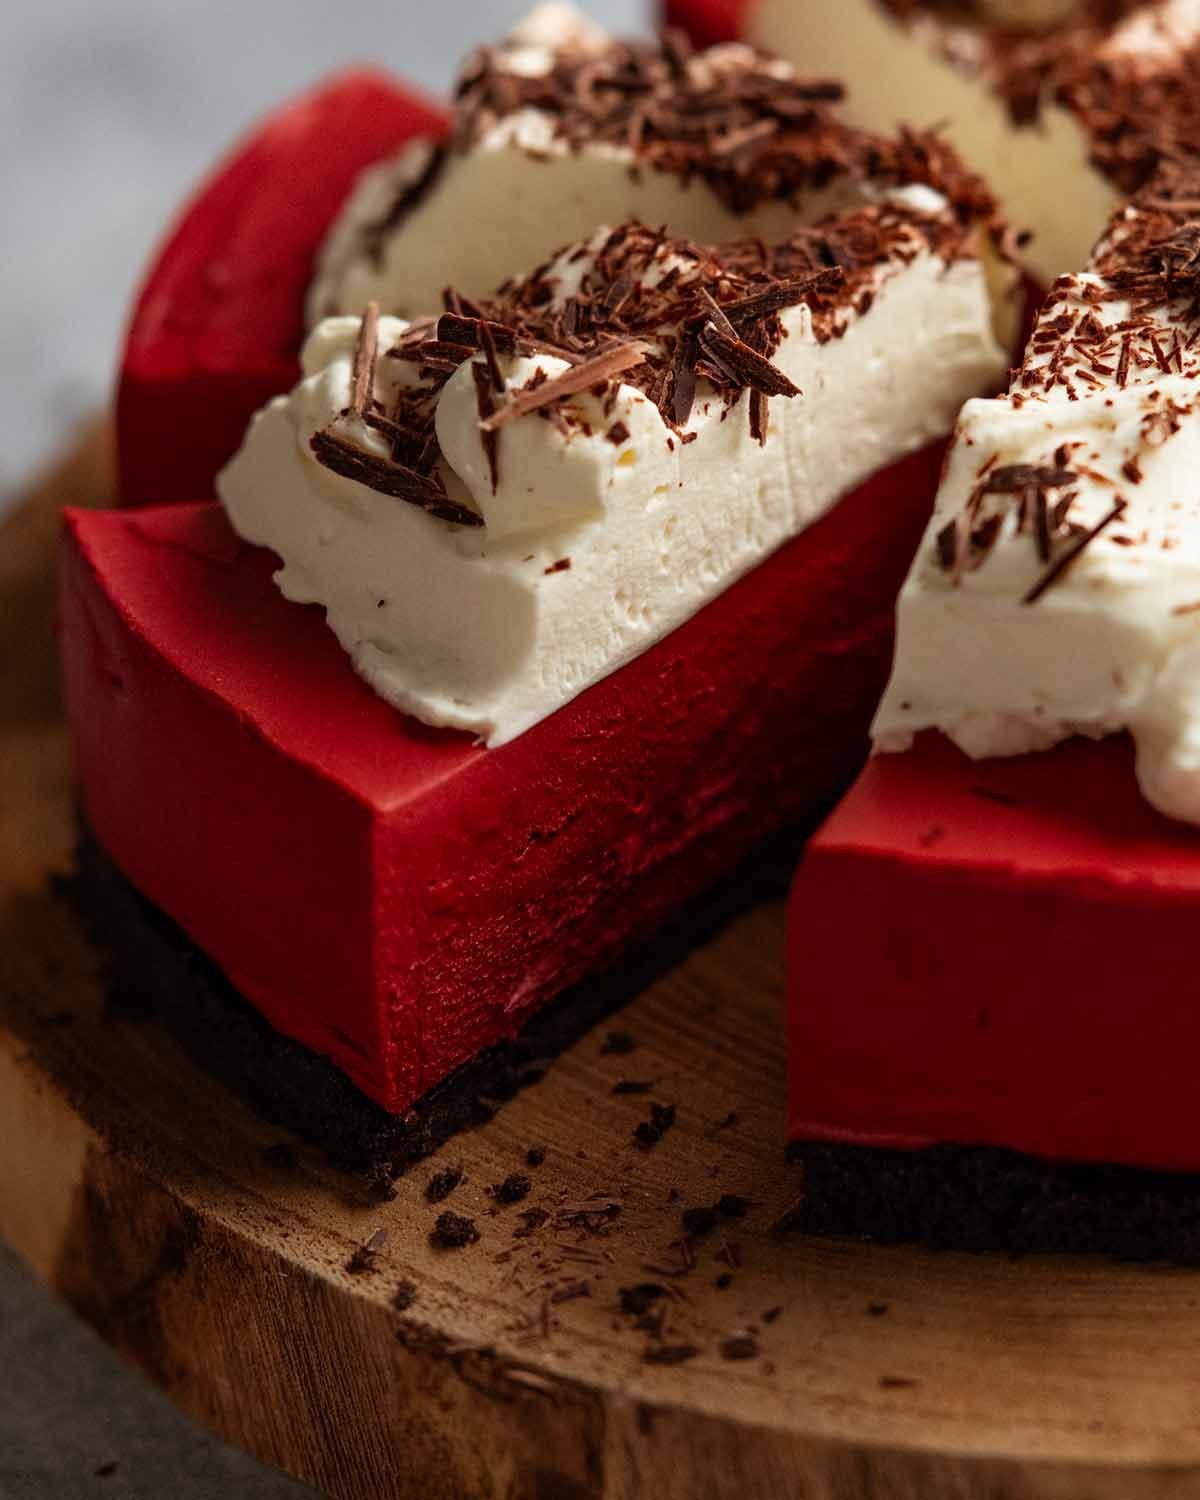
While a graham cracker crust is traditional for many cheesecakes, the **Red Velvet Cheesecake** demands something bolder. An Oreo cookie crust provides a deep, dark chocolate contrast to the bright red filling.
The key to a good cookie crust is the ratio of crumbs to butter. You want enough butter to bind the crumbs so they don’t fall apart when sliced, but not so much that the crust becomes greasy. Pressing the crumbs firmly into the pan and pre-baking for 10 minutes ensures a crisp, sturdy base for your heavy filling.
Serving and Presentation Tips
This cheesecake is a visual masterpiece on its own, but a few finishing touches can take it to the next level. A border of piped whipped cream provides a clean, white contrast to the red center.
For a professional look, use a hot knife to slice the cheesecake. Dip the knife in hot water and wipe it clean between every single cut. This ensures those perfectly sharp, clean edges that you see in high-end bakeries.
Storage and Make-Ahead Advice
Cheesecake is the ultimate make-ahead dessert because it actually tastes better after a day or two in the fridge. The flavors have time to meld, and the texture becomes more firm and creamy.
You can store the cheesecake in the refrigerator for up to five days. If you need to store it longer, it freezes exceptionally well. Wrap the entire cake (without the whipped cream topping) in plastic wrap and then foil. It will stay fresh in the freezer for up to three months. Simply thaw in the refrigerator overnight before serving.
Ingredients
Method
- Preheat oven to 325°F (163°C).
- Mix Oreo crumbs, melted butter, and sugar in a small bowl.
- Press the mixture into the bottom of a 9-inch springform pan.
- Bake for 10 minutes, then set aside to cool.
- In a large bowl, beat cream cheese and sugar until smooth.
- Add eggs one at a time, beating on low speed after each addition.
- Stir in cocoa powder, sour cream, buttermilk, vanilla, vinegar, and red food coloring until well combined.
- Pour the filling over the cooled crust.
- Bake for 60-70 minutes or until the center is almost set but still slightly jiggly.
- Turn off the oven and leave the cheesecake inside with the door slightly ajar for 1 hour.
- Refrigerate for at least 6 hours or overnight.
- Whip the heavy cream, powdered sugar, and vanilla until stiff peaks form.
- Pipe or spread the whipped cream over the chilled cheesecake.
- Garnish with chocolate shavings before serving.